What to Expect Before, During and After Epoxy Floor Installation
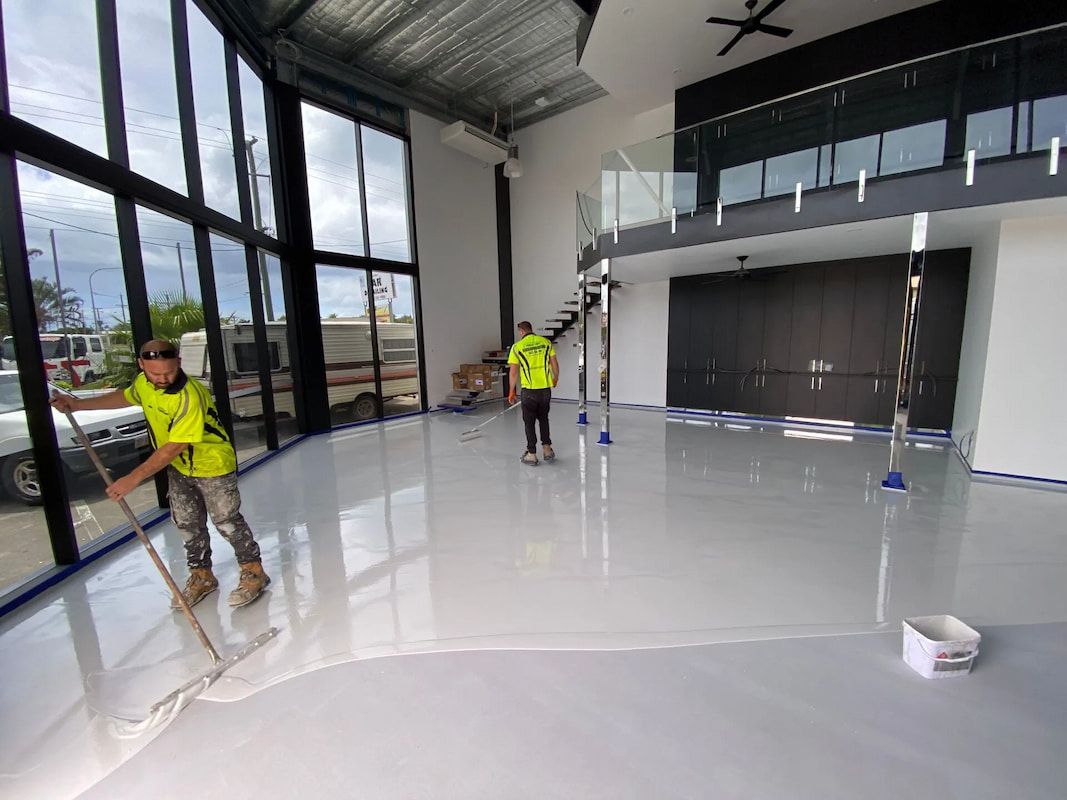
A concrete floor takes a beating. Forklifts, foot traffic, spilt chemicals, moisture from the ground below and years of general wear all leave their mark eventually. Epoxy flooring in Hervey Bay has become a popular way to protect that concrete while giving it a smooth, easy-to-clean finish that suits homes, retail spaces, warehouses and industrial sites alike.
But an epoxy floor is only as good as the process behind it. From the first site visit to the final cure, each stage plays a part in how the floor performs and how long it lasts. Here's a look at what property owners can expect at every step.
Assessing the Site Before Any Work Begins
Before any epoxy is mixed, a proper site assessment sets the direction for the whole project. This is where the scope of the job, the condition of the existing floor and any practical constraints around access or scheduling are worked out.
During this stage, a contractor will typically:
- Walk through the space to understand its use, foot traffic and any exposure to chemicals, oil or water
- Measure the area to calculate materials and estimate a realistic timeframe
- Discuss the finish, colour and level of slip resistance suited to the space
- Identify any obstacles such as fixed equipment, drainage points or structural columns
This groundwork helps avoid surprises later and gives the property owner a clear picture of what the job will involve.
Inspecting the Concrete Slab
Epoxy bonds to concrete, so the condition of that slab matters more than most people expect. A slab with existing damage, poor drainage or a history of water ingress needs to be addressed before coating begins, otherwise the epoxy won't adhere properly or may fail early.
A thorough concrete inspection generally covers:
- Checking for existing cracks, spalling or uneven areas
- Looking at the slab's age and any previous coatings or sealants applied
- Assessing the surrounding drainage and grading, particularly relevant where waterproofing in Hervey Bay has been carried out previously or may be needed
- Noting any areas where water tends to pool or seep through
Where waterproofing issues are found, these are usually resolved before flooring work proceeds, since epoxy is not designed to manage ongoing water intrusion on its own.
Testing for Moisture
Moisture trapped beneath a concrete slab is one of the most common reasons epoxy coatings fail. Even concrete that looks dry can be holding moisture that rises to the surface over time, causing the coating to bubble, discolour or peel away.
Moisture testing typically involves:
- Using a moisture meter or calcium chloride test to measure vapour emission from the slab
- Testing multiple points across the floor, as levels can vary from one area to another
- Comparing results against industry-accepted thresholds before proceeding
- Recommending a moisture barrier or vapour-mitigating primer if readings are too high
Skipping this step is one of the quickest ways to end up with a floor that doesn't hold up, so it's worth the extra day it takes to get right.
Preparing the Surface
Surface preparation is where the real transformation of the floor begins. Epoxy needs a clean, slightly textured surface to bond to, which means removing anything that could interfere with adhesion.
This stage usually includes:
- Diamond grinding or shot blasting to open the concrete pores and remove old coatings
- Vacuuming and cleaning the surface thoroughly to remove dust and debris
- Degreasing any areas affected by oil, grease or chemical staining
- Checking the surface profile matches what the chosen epoxy system requires
Skipping or rushing this step is one of the main reasons coatings peel or bubble later, so it's given proper attention regardless of how long it takes.
Repairing Cracks and Joints
Cracks, control joints and minor surface damage need to be addressed before coating, since epoxy will simply reflect any flaws in the concrete beneath it rather than hide them.
Typical repair work includes:
- Filling hairline cracks with a flexible epoxy or polyurethane filler
- Patching larger areas of spalled or damaged concrete
- Deciding whether control joints should be filled or left to move naturally with the slab
- Allowing repaired sections adequate time to cure before the next stage
Getting this right means the finished floor looks even and performs consistently across its entire surface.
Applying the Primer
A primer coat improves adhesion between the concrete and the epoxy topcoat, and it also helps seal any remaining porosity in the slab. This step is straightforward but still requires the right conditions to do properly.
During priming, the contractor will generally:
- Apply a penetrating primer suited to the concrete's porosity and moisture levels
- Work in manageable sections to maintain a wet edge and avoid lap marks
- Allow the recommended drying time before the next coat, which varies with temperature and humidity
- Inspect the primed surface for even coverage before moving forward
Skipping the primer, or applying it in the wrong conditions, can lead to poor bonding further down the track.
Installing Epoxy Flooring in Hervey Bay
This is the stage most people picture when they think of epoxy flooring in Hervey Bay: the application of the coloured epoxy system itself. Depending on the space and its intended use, this might be a straightforward two-coat system or a more detailed build-up involving decorative flakes, quartz or a topcoat for added durability.
Installation generally involves:
- Mixing the epoxy in small batches to manage working time accurately
- Applying the base coat evenly using rollers or squeegees, depending on the area
- Adding decorative elements such as flakes or metallic pigments if requested
- Applying a clear topcoat for added protection against abrasion, chemicals or UV exposure where relevant
Local humidity and temperature play a role here too, so timing is adjusted to suit Hervey Bay's climate rather than following a fixed schedule regardless of conditions.
Curing Time and What Happens Next
Once the final coat is down, the floor needs time to cure properly before it's put back into use. This is often the stage property owners are most curious about, since it affects how quickly the space can be reopened.
As a general guide:
- Light foot traffic is usually possible within 24 hours
- Heavier use, including furniture or equipment, is typically fine after 48 to 72 hours
- Full chemical and heavy load resistance is generally reached after 5 to 7 days
- Ongoing care such as regular sweeping, prompt clean-up of spills and avoiding harsh abrasive cleaners helps maintain the finish over the years ahead
Curing times can shift depending on temperature, humidity and the specific epoxy system used, so it's worth confirming exact timeframes with the contractor before planning around them.
Getting the Right Team for the Job
Choosing a contractor who understands each of these stages, rather than one who jumps straight to applying coating, makes a noticeable difference to how the floor performs over time. Moisture testing, proper surface preparation and adequate curing all take time and judgement that come from working across different sites and conditions.
We at Fraser Coast Waterproofing take care of every stage of the process, from the initial site assessment through to the final cure, so property owners can be confident their floor is set up to last. If you're planning a project or want to know whether your existing concrete is suited to an epoxy flooring in Hervey Bay, get in touch with our team for an assessment or give us a call to discuss your space.
Frequently Asked Questions
How long does an epoxy flooring installation usually take?
Most residential projects take two to four days from surface preparation through to the final coat, while larger commercial or industrial spaces can take a week or more. The exact timeframe depends on the size of the area, the condition of the existing concrete and the specific epoxy system chosen.
Can epoxy be applied over an existing damaged or cracked floor?
Cracks and damage need to be repaired before coating begins, since epoxy will not disguise structural issues in the slab. Once cracks are filled and the surface is properly prepared, epoxy can then be applied to give a smooth, even finish.
Is epoxy flooring suitable for areas prone to moisture?
Moisture testing is carried out before any work begins to check whether the slab is dry enough for coating. If moisture levels are too high, additional waterproofing measures or a vapour barrier may be recommended before the epoxy is applied.
How should an epoxy floor be maintained once it's installed?
Regular sweeping and mopping with a mild cleaner keeps the surface looking its best, and spills should be cleaned up promptly to avoid staining. Avoiding harsh abrasive tools and steel wool helps protect the topcoat and extends the life of the finish.